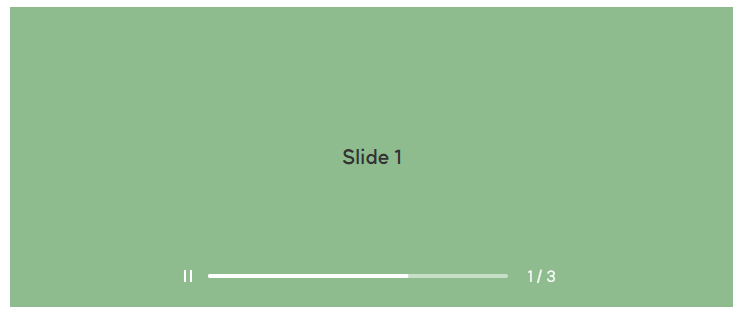
결과 화면

https://heejae0811.github.io/vue-components/


Vue/Nuxt Components

뷰/넉스트 컴포넌트입니다.

heejae0811.github.io


https://v2.nuxt.com/deployments/github-pages#github-actions


GitHub Pages

How to deploy Nuxt app on GitHub Pages?

v2.nuxt.com

Nuxt 깃허브 배포에 대한 자세한 설명은 위의 공식문서를 참고한다.


1. nuxt.config.js

정적 사이트로 배포해야 하기 때문에 target: 'static'을 추가하고,

router에는 깃 레포지토리 이름을 작성한다.

export default {
  target: 'static',
  router: {
    base: '/깃 레포지토리 이름/'
  },
  
  ...
}


2. push-dir 설치하기

터미널에서 아래 명령어를 실행한다.

설치된 버전은 package.json 파일에서 확인할 수 있다.

yarn add --dev push-dir


3. package.json

scripts 부분에 "deploy" : "~~" 를 추가한다.

{
  ...
  "scripts": {
    "dev": "nuxt",
    "build": "nuxt build",
    "start": "nuxt start",
    "generate": "nuxt generate",
    "deploy": "push-dir --dir=dist --branch=gh-pages --cleanup"
  },
  ...
}


4. 배포하기

터미널에서 yarn generate 명령어를 실행하면 dist 폴더가 생기는 것을 볼 수 있다.

yarn deploy 명령어를 실행하면 깃허브에 배포된다.

yarn generate
yarn deploy


5. 깃허브 Settings

위의 과정을 수행했음에도 깃허브 페이지가 배포가 되지 않는다면 깃 레포지토리 Settings을 확인해 본다.

깃 레포지토리 - Settings - Pages에서 Branch가 gh-pages로 되어있는지 확인한다.

결과 화면


버전

vue: 2.7.10

nuxt: 2.15.8


vue, nuxt 버전 2.x.x 기준으로 작성한 글이기 때문에 버전  3.x.x에서는 동작하지 않을 수 있다.


2023.11 기준 스와이퍼 버전 11까지 나왔다.

최신 버전의 뷰 스와이퍼에 대한 자세한 설명은 공식 문서를 참고한다.

https://swiperjs.com/vue


1. swiper, vue-awesome-swiper 패키기 설치하기

swiper와 vue-awesome-swiper 패키지를 설치한다.

반드시 해당 버전으로 설치한다.

yarn add swiper@5.4.5
yarn add vue-awesome-swiper@4.1.1

또는

npm install swiper@5.4.5
npm install vue-awesome-swiper@4.1.1


2. 마크업 하기

  • pages/swiper.vue
  1. 컴포넌트가 아닌 HTML로 마크업 한다. 이때 class명은 swiper 패키지에서 제공하는 것으로 사용한다.
    (swiper-container, swiper-wrapper, swiper-slide)
  2. 커스텀으로 autoplay, progress를 만들 것이기 때문에 마찬가지로 HTML로 마크업 한다.
    autoplay 속성의 true/false에 따라서 css가 바뀌어야 하기 때문에 클릭 이벤트와 :class 속성을 추가한다.
<template>
  <section class="kv-swiper">
    <div
      v-once
      v-swiper:swiper="kvSwiperOption"
      class="swiper-container">
      <ul class="swiper-wrapper">
        <li class="swiper-slide">Slide 1</li>
        <li class="swiper-slide">Slide 2</li>
        <li class="swiper-slide">Slide 3</li>
      </ul>
    </div>

    <div class="swiper-function">
      <div
        class="swiper-autoplay"
        :class="{ stop: kvAutoplay }"
        @click="kvSwiperAutoplay">
        <span/>
      </div>

      <div
        class="swiper-progress"
        :class="{ start: kvProgress }">
        <span class="bar"/>
      </div>

      <div class="swiper-pagination"/>
    </div>
  </section>
</template>


3. script 작성하기

  1. v-once, v-swiper 디렉티브를 사용하기 위해서 vue 컴포넌트를 import 한다.
  2. vue-awesome-swiper와 swiper.css를 import 한다.
  3. kvAutoplay, kvProgress를 false로 설정한다. (페이지가 로딩되기 전에 동작되면 안 되기 때문에)
  4. kvSwiperOption을 작성한다. kvSwiperOption의 on 부분에 autoplay에 관한 메서드를 작성한다.
    (다음 슬라이드로 넘길 때 autoplay와 progress를 초기화하기 위해서)
    스와이퍼의 다양한 속성들을 사용하고 싶으면 공식 문서를 참고한다. (https://swiperjs.com/demos
  5. autoplay와 progress 동작에 필요한 메서드를 작성한다. 이때 try/catch 구조로 작성해야 한다.
<script>
import Vue from 'vue'
import VueAwesomeSwiper from 'vue-awesome-swiper'
import 'swiper/css/swiper.css'

Vue.use(VueAwesomeSwiper)

export default {
  name: 'SwiperPage',

  data() {
    return {
      // Kv autoplay, progress
      kvAutoplay: false,
      kvProgress: false,

      // Kv swiper option
      kvSwiperOption: {
        effect: 'fade',
        slidesPerView: 1,
        spaceBetween: 0,
        loop: true,
        autoplay: {
          delay: 5000
        },
        pagination: {
          el: '.swiper-pagination',
          type: 'fraction'
        },
        on: {
          init: this.init,
          sliderMove: this.stopAutoplay,
          slideChangeTransitionStart: this.stopAutoplay,
          transitionEnd: this.startAutoplay
        }
      }
    }
  },

  methods: {
    init() {
      this.kvProgress = true
    },

    kvSwiperAutoplay() {
      this.kvAutoplay = !this.kvAutoplay

      if (this.kvProgress) {
        this.stopAutoplay()
      } else {
        this.startAutoplay()
      }
    },

    stopAutoplay() {
      try {
        this.swiper.autoplay.stop()
        this.kvProgress = false
      } catch (err) {
        console.error(err)
      }
    },

    startAutoplay() {
      try {
        this.swiper.autoplay.start()
        this.kvProgress = true
        this.kvAutoplay = false
      } catch (err) {
        console.error(err)
      }
    }
  }
}
</script>


4. css/scss 작성하기

  1. progress는 script의 autoplay 속도와 css의 keyframes과 animation 속도에 맞춰 움직일 수 있도록 css를 작성한다. (animation: kvProgress 5s linear infinite;)
  2. 스와이퍼에 필요한 css를 작성한다.
<style lang="scss" scoped>
@keyframes kvProgress {
  from {
    transform: translateX(-100%);
  }
  to {
    transform: translateX(0);
  }
}

.kv-swiper {
  position: relative;
  height: 300px;
  padding: 20px;

  .swiper-container {
    height: 100%;

    .swiper-slide {
      ...
    }
  }

  .swiper-function {
    ...

    .swiper-autoplay {
      position: relative;
      cursor: pointer;

      span {
        &::after {
          position: absolute;
          top: 50%;
          left: 50%;
          transform: translate(-50%, -50%);
          width: 4px;
          height: 12px;
          border-left: 2px solid #fff;
          border-right: 2px solid #fff;
          content: '';
        }
      }

      &.stop {
        span {
          &::after {
            width: 0;
            height: 0;
            border-right: 0;
            border-left: 10px solid #fff;
            border-top: 6px solid transparent;
            border-bottom: 6px solid transparent;
          }
        }
      }
    }

    .swiper-progress {
      overflow: hidden;
      width: 300px;
      height: 4px;
      background-color: rgba(255, 255, 255, 0.5);
      border-radius: 4px;

      &.start {
        .bar {
          animation: kvProgress 5s linear infinite;
        }
      }

      .bar {
        display: block;
        width: 100%;
        height: 4px;
        transform: translateX(-100%);
        background-color: #fff;
      }
    }

    .swiper-pagination {
      ...
    }
  }
}
</style>

결과 화면


버전

vue: 2.7.10

nuxt: 2.15.8


vue, nuxt 버전 2.x.x 기준으로 작성한 글이기 때문에 버전  3.x.x에서는 동작하지 않을 수 있다.


2023.11 기준 스와이퍼 버전 11까지 나왔다.

최신 버전의 뷰 스와이퍼에 대한 자세한 설명은 공식 문서를 참고한다.

https://swiperjs.com/vue


1. swiper, vue-awesome-swiper 패키기 설치하기

swiper와 vue-awesome-swiper 패키지를 설치한다.

반드시 해당 버전으로 설치한다.

yarn add swiper@5.4.5
yarn add vue-awesome-swiper@4.1.1

또는

npm install swiper@5.4.5
npm install vue-awesome-swiper@4.1.1


2. Swiper, SwiperSlide 컴포넌트 사용해서 마크업 하기

  • pages/swiper.vue
  1. 슬라이드 부분은 <Swiper>와 <SwiperSlide> 컴포넌트를 사용해서 마크업 한다.
  2. autoplay 버튼과 pagination 부분은 HTML로 마크업 한다.
  3. autoplay의 true/false에 따라 css가 달라져야 하기 때문에 :class 속성을 추가한다.
<template>
  <section class="kv-swiper">
    <Swiper
      :options="kvSwiperOptions"
      ref="kvSwiper">
      <SwiperSlide>Slide 1</SwiperSlide>
      <SwiperSlide>Slide 2</SwiperSlide>
      <SwiperSlide>Slide 3</SwiperSlide>
    </Swiper>

    <div class="kv-function">
      <div
        class="swiper-autoplay"
        :class="{ stop: kvAutoplay }"
        @click="kvSwiperAutoplay">
        <span/>
      </div>
      <div
        class="swiper-pagination"
        :class="{ stop: kvPagination }"
        slot="pagination"/>
    </div>
  </section>
</template>


3. script 작성하기

  1. Swiper, SwiperSlide 컴포넌트와 swiper.css 파일을 import 한다.
  2. 커스텀 페이지네이션을 만들기 위해서 kvSwiperOptions의 pagination 부분에 renderBullet 속성을 추가한다.
  3. renderBullet 부분에 <svg> 태그를 사용해서 기존 페이지네이션 태그 대신에 <svg> 태그가 대신 렌더링 되게 한다.
  4. autoplay와 pagination 동작에 필요한 메서드를 작성한다.
<script>
import { Swiper, SwiperSlide } from 'vue-awesome-swiper'
import 'swiper/css/swiper.css'

export default {
  name: 'SwiperPage',

  components: {
    Swiper,
    SwiperSlide
  },

  data() {
    return {
      // kv autoplay, pagination
      kvAutoplay: false,
      kvPagination: false,

      // kv swiper options
      kvSwiperOptions: {
        effect: 'fade',
        slidesPerView: 1,
        spaceBetween: 0,
        loop: true,
        autoplay: {
            delay: 3800,
            disableOnInteraction: false
        },
        pagination: {
          el: '.swiper-pagination',
          clickable: true,
          paginationType: 'custom',
          renderBullet: function () {
            return `<div class="swiper-pagination-bullet">
              <svg viewBox="0 0 48 48" width="24" height="24" xml:space="preserve" id="svg">
                <circle class="pagination-loader" cx="24" cy="24" r="23" stroke="#da291c" fill="none" stroke-width="4" stroke-linecap="round"></circle>
                <circle class="pagination-circle" cx="24" cy="24" r="23" stroke="#fff" fill="none" stroke-width="4" stroke-linecap="round"></circle>
              </svg>
            </div>`
          }
        }
      }
    }
  },

  computed: {
    kvSwiper() {
      return this.$refs.kvSwiper.$swiper
    }
  },

  methods: {
    kvSwiperAutoplay() {
      this.kvAutoplay = !this.kvAutoplay
      this.kvPagination = !this.kvPagination

      if (this.kvAutoplay) {
        this.kvSwiper.autoplay.stop()
      } else {
        this.kvSwiper.autoplay.start()
      }
    }
  }
}
</script>


4. css/scss 작성하기

움직이는 svg 이미지를 만들기 위해서는 css가 매우 중요하다.


stroke-dasharray 속성은 선을 dash(점선) 형태로 만든다.

dasharray 값은 점선을 만드는 간격을 의미하고, 숫자가 작아질수록 점선이 촘촘하다.


stroke-dashoffset 속성은 svg 이미지가 어떤 지점부터 시작할지 정해준다.

시작점은 시계방향의 90도이다.

또한 dash 값들은 svg 태그의 path 값과 관련이 있어 글로 된 설명보다는 직접 숫자를 수정해 가며 결과로 확인하는 것이 낫다. 


@keyframe, animation을 사용해서 svg 이미지가 움직일 수 있도록 css를 작성한다.

<style lang="scss" scoped>
@keyframes loading {
  0% {
    stroke-dashoffset: 192;
  }
  100% {
    stroke-dashoffset: 0;
  }
}

.kv-swiper {
  position: relative;
  height: 300px;

  .swiper-container {
    height: 100%;

    .swiper-slide {
      ...
    }
  }

  .kv-function {
    position: absolute;
    left: 50%;
    bottom: 30px;
    z-index: 1;
    transform: translateX(-50%);

    .swiper-autoplay {
      ...
    }

    .swiper-pagination::v-deep {
      position: relative;

      .swiper-pagination-bullet {
        width: 10px;
        height: 10px;
        margin: 0 5px;
        background-color: #fff;
        opacity: 1;
        cursor: pointer;

        svg {
          display: none;
          transform: rotate(-90deg);

          .pagination-loader {
            stroke-dasharray: 192;
            stroke-dashoffset: 192;
            animation: loading 5s linear infinite;
          }

          .pagination-circle {
            stroke-opacity: 0.2;
          }
        }
      }

      .swiper-pagination-bullet-active {
        width: 24px;
        height: 15px;
        background-color: transparent;

        svg {
          display: block;
        }
      }

      &.stop {
        .swiper-pagination-bullet {
          svg {
            .pagination-loader {
              stroke: none;
              animation-play-state: paused;
            }
          }
        }
      }
    }
  }
}
</style>

결과 화면


버전

vue: 2.7.10

nuxt: 2.15.8


vue, nuxt 버전 2.x.x 기준으로 작성한 글이기 때문에 버전  3.x.x에서는 동작하지 않을 수 있다.


2023.11 기준 스와이퍼 버전 11까지 나왔다.

최신 버전의 뷰 스와이퍼에 대한 자세한 설명은 공식 문서를 참고한다.

https://swiperjs.com/vue


1. swiper, vue-awesome-swiper 패키기 설치하기

swiper와 vue-awesome-swiper 패키지를 설치한다.

반드시 해당 버전으로 설치한다.

yarn add swiper@5.4.5
yarn add vue-awesome-swiper@4.1.1

또는

npm install swiper@5.4.5
npm install vue-awesome-swiper@4.1.1


2. Swiper, SwiperSlide 컴포넌트 사용하기

  • pages/swiper.vue
  1. Swiper, SwiperSlide 컴포넌트를 import 한다.
  2. swiper.css를 import 한다.
  3. <Swiper>와 <SwiperSlier> 컴포넌트를 사용해 마크업을 한다.
    이때 prev, next 버튼과 페이지네이션은 <Swiper> 컴포넌트 밖에 작성한다. (안에 있으면 SwiperSlide와 같이 움직이기 때문에 밖으로 뺀다.)
  4. kvSwiperOptions을 작성한다.
    가장 많이 사용하는 속성은 slidesPerView(슬라이드가 몇 개씩 노출되는지), spaceBetween(슬라이드 간의 간격)이고, 이외의 다양한 속성들은 공식 문서를 참고한다. (https://swiperjs.com/demos)
  5. swiper.css는 기본적인 스타일만 제공하기 때문에 크기, 배경, 글자, 위치 등은 css를 추가로 작성한다.
<template>
  <section class="kv-swiper">
    <Swiper :options="kvSwiperOptions">
      <SwiperSlide>Slide 1</SwiperSlide>
      <SwiperSlide>Slide 2</SwiperSlide>
      <SwiperSlide>Slide 3</SwiperSlide>
      <SwiperSlide>Slide 4</SwiperSlide>
      <SwiperSlide>Slide 5</SwiperSlide>
    </Swiper>

    <div class="swiper-button-prev"></div>
    <div class="swiper-button-next"></div>

    <div class="swiper-pagination"></div>
  </section>
</template>

<script>
import { Swiper, SwiperSlide } from 'vue-awesome-swiper'
import 'swiper/css/swiper.css'

export default {
  name: 'SwiperPage',

  components: {
    Swiper,
    SwiperSlide
  },

  data() {
    return {
      kvSwiperOptions: {
        slidesPerView: 2,
        spaceBetween: 20,
        loop: true,
        navigation: {
          prevEl: '.swiper-button-prev',
          nextEl: '.swiper-button-next'
        },
        pagination: {
          el: '.swiper-pagination'
        }
      }
    }
  }
}
</script>

<style lang="scss" scoped>
.kv-swiper {
  position: relative;
  height: 300px;

  .swiper-container {
    height: 100%;

    .swiper-slide {
      ...
    }
  }

  .swiper-button-prev,
  .swiper-button-next {
    &::after {
      color: #333;
    }
  }

  .swiper-pagination::v-deep {
    bottom: -30px;
    width: 100%;

    .swiper-pagination-bullet {
      margin: 0 5px;
      cursor: pointer;
    }

    .swiper-pagination-bullet-active {
      background-color: #333;
    }
  }
}
</style>

결과 화면


생명 주기 훅

mounted()는 뷰의 생명 주기 훅 중에 하나이다.

DOM에 노드 생성 및 삽입(초기 렌더링)이 된 직후이다.


1. BaseKeyVisual 컴포넌트 만들기

  • components/base/BaseKeyVisual.vue
  1. <picture> HTML 태그를 사용해 뷰포트에 따라 다른 이미지를 적용할 수 있게 만든다. (피씨 이미지, 모바일 이미지)
  2. kvActive 속성을 false로 설정해 이미지가 화면에 보이지 않게 만든다. css도 opacity: 0; 으로 한다.
  3. mounted()에 setTimeout을 사용해 kvActive 속성을 true로 바꿔 렌더링이 된 직후 'active' 클래스가 붙도록 만든다.
  4. 'active' 클래스가 붙으면 opacity: 1; 이 되고, transform 등 다른 효과를 추가해도 된다.
<template>
  <div
    class="base-key-visual"
    :class="{ 'active': kvActive }">
    <picture>
      <source :srcset="kvMoImgSrc" media="(max-width: 720px)">
      <img :src="kvImgSrc" alt="Key visual">
    </picture>
  </div>
</template>

<script>
export default {
  name: 'BaseKeyVisual',

  props: {
    kvImgSrc: {
      type: String
    },
    kvMoImgSrc: {
      type: String
    }
  },

  data() {
    return {
      kvActive: false
    }
  },

  mounted() {
    setTimeout(() => {
      this.kvActive = true
    }, 0)
  }
}
</script>

<style lang="scss">
.base-key-visual {
  overflow: hidden;
  width: 100%;
  background-color: #111;
  border-radius: 16px;

  img {
    width: 100%;
    opacity: 0;
    transform: scale(1.1);
    transition: all 2s;
  }

  &.active {
    img {
      opacity: 1;
      transform: scale(1);
    }
  }
}
</style>


2. 페이지에 BaseKeyVisual 컴포넌트 import 하기

  • pages/index.vue
  1. 만든 <BaseKeyVisual> 컴포넌트를 import 한다.
  2. kvImgSrc, kvMoImgSrc 속성을 작성한다. 이미지 경로를 작성할 때에는 required('~~')를 사용한다.
<template>
  <TheLayout>
    <BaseKeyVisual
      :kvImgSrc="kvImgSrc"
      :kvMoImgSrc="kvMoImgSrc"/>
  </TheLayout>
</template>

<script>
import TheLayout from '@/components/layout/TheLayout'
import BaseKeyVisual from '@/components/base/BaseKeyVisual'

export default {
  name: 'Main',

  components: {
    TheLayout,
    BaseKeyVisual
  },

  data() {
    return {
      kvImgSrc: require('@/static/image/kv.jpg'),
      kvMoImgSrc: require('@/static/image/kv.jpg')
    }
  }
}
</script>

결과 화면


1. BaseSelect 컴포넌트 만들기

  • components/base/BaseSelect.vue
  1. form-select와 form-select-list로 나누어 html을 작성한다. 이때 form-select-list 부분은 리스트의 길이가 3개가 넘어갈 경우, 스크롤이 나타날 수 있게끔 class 속성을 추가한다.
  2. isOpen Boolean 속성을 이용해 form-select 영역을 클릭했을 때 form-select-list가 나타날 수 있도록 v-if와 @click 이벤트를 추가한다.
  3. props로 전달받을 데이터의 타입을 정의한다.
  4. computed와 methods를 이용해 form-select-list를 클릭했을 때 그 값이 form-select에 노출될 수 있도록 만든다.
  5. 공통으로 적용할 css/scss를 작성한다.
<template>
  <div
    class="base-select"
    :class="[
      shape,
      { 'open': isOpen }
    ]">

    <div
      class="form-select"
      @click="isOpen = !isOpen">
      <p :class="[{ 'selected': isSelect }]">{{ selected }}</p>
      <svg width="12" height="8" viewBox="0 0 12 8" fill="none" xmlns="http://www.w3.org/2000/svg">
        <path d="M11 1.17C10.8126 0.983753 10.5592 0.879211 10.295 0.879211C10.0308 0.879211 9.77737 0.983753 9.59001 1.17L6.00001 4.71L2.46001 1.17C2.27265 0.983753 2.0192 0.879211 1.75501 0.879211C1.49082 0.879211 1.23737 0.983753 1.05001 1.17C0.956281 1.26297 0.881887 1.37357 0.831118 1.49543C0.780349 1.61729 0.754211 1.74799 0.754211 1.88C0.754211 2.01202 0.780349 2.14272 0.831118 2.26458C0.881887 2.38644 0.956281 2.49704 1.05001 2.59L5.29001 6.83C5.38297 6.92373 5.49357 6.99813 5.61543 7.04889C5.73729 7.09966 5.868 7.1258 6.00001 7.1258C6.13202 7.1258 6.26273 7.09966 6.38459 7.04889C6.50645 6.99813 6.61705 6.92373 6.71001 6.83L11 2.59C11.0937 2.49704 11.1681 2.38644 11.2189 2.26458C11.2697 2.14272 11.2958 2.01202 11.2958 1.88C11.2958 1.74799 11.2697 1.61729 11.2189 1.49543C11.1681 1.37357 11.0937 1.26297 11 1.17Z" fill="#111111"/>
      </svg>
    </div>

    <div
      v-if="isOpen"
      class="form-select-list">
      <div :class="{ 'scroll': options.length > 3 }">
        <ul>
          <li
            v-for="(option, key) in options"
            :key="`option-${key}`"
            @click="selectOption(option)">
            {{ option.name }}
          </li>
        </ul>
      </div>
    </div>
  </div>
</template>

<script>
export default {
  name: 'BaseSelect',

  props: {
    shape: {
      type: String
    },
    isSelect: {
      type: Boolean,
      default: false
    },
    options: {
      type: Array
    },
    defaultValue: {
      type: String
    }
  },

  data() {
    return {
      isOpen: false
    }
  },

  computed: {
    selected: {
      get() {
        return this.options.find(item => item.name === this.defaultValue)?.name || this.defaultValue || '옵션을 선택해 주세요.'
      }
    }
  },

  methods: {
    selectOption(option) {
      this.selected = option.name
      this.isOpen = false
      this.isSelect = true
      this.$emit('input', option.name)
    }
  }
}
</script>

<style lang="scss" scoped>
.base-select {
  position: relative;
  
  .form-select {
    display: flex;
    justify-content: space-between;
    align-items: center;
    width: 100%;
    height: 60px;
    padding: 0 15px;
    background-color: #fff;
    border: 1px solid #ddd;
    cursor: pointer;

    svg {
      transition: all 0.3s;
    }
  }

  .form-select-list {
    position: absolute;
    top: 65px;
    left: 0;
    right: 0;
    z-index: 10;

    & > div {
      &.scroll {
        height: 240px;

        ul {
          overflow-y: auto;
          height: 100%;
          padding-right: 5px;

          &::-webkit-scrollbar {
            width: 5px;
          }

          &::-webkit-scrollbar-thumb {
            background-color: #f5f5f5;
          }
        }
      }
    }

    ul {
      background-color: #fff;
      border: 1px solid #333;

      li {
        height: 60px;
        padding: 0 15px;
        line-height: 60px;
        transition: all .3s;
        cursor: pointer;

        &:hover {
          background-color: #f5f5f5;
        }
      }
    }
  }
  ...
}
</style>


2. 페이지에 BaseSelect 컴포넌트 import 하기

  • pages/index.vue
  1. 만든 <BaseSelect> 컴포넌트를 import 한다.
  2. data() 부분에 props로 넘길 데이터를 작성한다. selectValue1, selectValue2는 빈 값으로 만들어 클릭한 값이 들어올 수 있도록 한다. 
  3. v-model을 통해서 selectValue 값이 바뀌는 것을 확인한다.
<template>
  <TheLayout>
    <div class="select">
      <BaseSelect
        :options="selectList"
        :defaultValue="selectValue1"
        v-model="selectValue1"/>

      <BaseSelect
        shape="black"
        :options="selectList"
        :defaultValue="selectValue2"
        v-model="selectValue2"/>
    </div>
  </TheLayout>
</template>

<script>
import TheLayout from '@/components/layout/TheLayout'
import BaseSelect from '@/components/base/BaseSelect'

export default {
  name: 'Main',

  components: {
    TheLayout,
    BaseSelect
  },

  data() {
    return {
      selectValue1: '',
      selectValue2: '',

      selectList: [
        {
          name: '1번'
        },
        {
          name: '2번'
        },
        {
          name: '3번'
        },
        {
          name: '4번'
        },
        {
          name: '5번'
        }
      ]
    }
  }
}
</script>

<style lang="scss" scoped>
...
</style>

결과 화면


1. BaseAccordion 컴포넌트 만들기

  • components/base/BaseAccordion.vue

아코디언은 제목 부분을 클릭하면 내용 부분이 나타나는 레이아웃을 의미한다.

  1. title과 content로 나누어 html을 작성한다. 이때 content 부분은 펼쳐지는 느낌이 날 수 있도록 <transition> 컴포넌트를 이용한다.
  2. <transition> 컴포넌트의 @enter, @leave 메소드에 el.scrollHeight를 사용해서 내용에 따라서 높이값을 정할 수 있도록 한다.
  3. toggle 클릭 이벤트와 currentAccordion 속성을 이용해 title 부분을 클릭할 때마다 content 부분을 show/hide 시킨다.
  4. 공통으로 적용할 css/scss를 작성한다.
<template>
  <div class="base-accordion">
    <div
      class="title"
      @click="toggle">
      <slot name="title"/>
    </div>

    <transition
      name="accordion" appear
      @before-enter="beforeEnter" @enter="enter"
      @before-leave="beforeLeave" @leave="leave">
      <div
        v-show="currentAccordion"
        class="content">
        <slot name="content"/>
      </div>
    </transition>
  </div>
</template>

<script>
export default {
  name: 'BaseAccordion',

  data() {
    return {
      currentAccordion: false
    }
  },

  methods: {
    toggle() {
      this.currentAccordion = !this.currentAccordion
    },
    beforeEnter(el) {
      el.style.height = '0'
    },
    enter(el) {
      el.style.height = el.scrollHeight + 'px'
    },
    beforeLeave(el) {
      el.style.height = el.scrollHeight + 'px'
    },
    leave(el) {
      el.style.height = '0'
    }
  }
}
</script>

<style lang="scss" scoped>
.base-accordion {
  .title {
    padding: 20px;
    border-bottom: 1px solid #ddd;
    font-size: 16px;
    font-weight: 700;
    cursor: pointer;
  }

  .content {
    overflow: hidden;
    padding: 20px;
    background-color: #f5f5f5;
    transition: all 0.3s;
  }
}
</style>


2. 페이지에 BaseAccordion 컴포넌트 import 하기

  • pages/index.vue
  1. 만든 <BaseAccordion> 컴포넌트를 import 한다.
  2. <slot>으로 만든 부분에 내용이 들어갈 수 있도록 속성에 맞추어 내용을 작성한다.
<template>
  <TheLayout>
    <div class="accordion">
      <BaseAccordion>
        <h3 slot="title">첫번째 제목</h3>
        <p slot="content">
          내용입니다. 내용입니다. 내용입니다.
          내용입니다. 내용입니다. 내용입니다.
          내용입니다. 내용입니다. 내용입니다.
        </p>
      </BaseAccordion>

      <BaseAccordion>
        <h3 slot="title">두번째 제목</h3>
        <p slot="content">
          내용입니다. 내용입니다. 내용입니다.
          내용입니다. 내용입니다. 내용입니다.
        </p>
      </BaseAccordion>

      <BaseAccordion>
        <h3 slot="title">세번째 제목</h3>
        <p slot="content">
          내용입니다. 내용입니다. 내용입니다.
          내용입니다. 내용입니다. 내용입니다.
        </p>
      </BaseAccordion>
    </div>
  </TheLayout>
</template>

<script>
import TheLayout from '@/components/layout/TheLayout'
import BaseAccordion from '@/components/base/BaseAccordion'

export default {
  name: 'Main',

  components: {
    TheLayout,
    BaseAccordion
  }
}
</script>

<style lang="scss" scoped>
.accordion {
  border: 1px solid #ddd;

  .base-accordion::v-deep {
    &:last-child {
      .title {
        border-bottom: 0;
      }
    }
  }
}
</style>

결과 화면


1. BaseTab 컴포넌트 만들기

  • components/base/BaseTab.vue
  1. tab이 몇 개인지 모르니 배열 타입으로 props 받는다.
  2. key와 currentTab에 따라서 탭의 on/off 상태를 나타낸다.
  3. 클릭하면 탭이 변경되어야 하기 때문에 $emit으로 클릭 이벤트를 만든다.
  4. 공통으로 적용할 css/scss를 작성한다.
<template>
  <div class="base-tab">
    <ul>
      <li
        v-for="(item, key) in tab"
        :key="`tab-${key}`"
        :class="{ 'on': key === currentTab }"
        @click="$emit('click', key)">
        {{ item.name }}
      </li>
    </ul>
  </div>
</template>

<script>
export default {
  name: 'BaseTab',

  props: {
    tab: {
      type: Array,
      required: true
    },
    currentTab: {
      type: Number,
      default: 0
    }
  }
}
</script>

<style lang="scss" scoped>
.base-tab {
  margin-bottom: 30px;

  ul {
    display: flex;
    justify-content: start;
    align: center;
    gap:  20px;

    li {
      padding: 0 5px;
      border-bottom: 2px solid transparent;
      color: #888;
      font-size: 20px;
      font-weight: 700;
      transition: all 0.3s;
      cursor: pointer;

      &:hover {
        color: #333;
      }

      &.on {
        color: #333;
        border-bottom: 2px solid #333;
      }
    }
  }
}
</style>


2. 페이지에 BaseTab import 하기

  • pages/index.vue
  1. 만든 <BaseTab> 컴포넌트를 import 한다.
  2. currentTab, tab 속성을 만들어 <BaseTab>에 데이터를 넘긴다.
  3. changeTab() 클릭 이벤트를 만들어 currentTab이 <BaseTab>의 key 값과 동일하게 만든다.
  4. v-if를 통해서 currentTab 값에 따라 영역을 나타나고, 안 보이게 한다.
<template>
  <TheLayout>
    <BaseTab
      :tab="tab"
      :currentTab="currentTab"
      @click="changeTab"/>

    <section v-if="currentTab === 0">
      탭 1 영역입니다.
    </section>

    <section v-if="currentTab === 1">
      탭 2 영역입니다.
    </section>
  </TheLayout>
</template>

<script>
import TheLayout from '@/components/layout/TheLayout'

export default {
  name: 'Index',

  components: {
    TheLayout
  },

  data() {
    return {
      currentTab: 0,
      tab: [
        { name: '탭 1' },
        { name: '탭 2' }
      ]
    }
  },

  methods: {
    changeTab(key) {
      this.currentTab = key
    }
  }
}
</script>

결과 화면


1. BaseModal 컴포넌트 만들기

  • components/base/BaseModal.vue

<BaseModal> 컴포넌트는 여러 가지 모양의 모달에서 사용될 기본 틀이다.

  1. 모달의 경우, 주로 닫기 버튼과 제목, 내용 영역으로 구성되기 때문에 닫기 버튼과 <slot>으로 기본 레이아웃을 만든다.
  2. 모달 바깥쪽 영역과 닫기 버튼을 누르면 모달이 닫히는 이벤트가 필요하기 때문에 $emit 을 이용해 클릭 이벤트를 만든다.
  3. 공통으로 적용할 css/scss를 작성한다.
<template>
  <div
    class="base-modal"
    @click.self="$emit('close')">
    <div class="wrap">
      <BaseButton @click="$emit('close')">X</BaseButton>

      <div class="title">
        <slot name="title"/>
      </div>

      <div class="content">
        <slot name="content"/>
      </div>
    </div>
  </div>
</template>

<script>
import BaseButton from '@/components/base/BaseButton'

export default {
  name: 'BaseModal',

  components: {
    BaseButton
  }
}
</script>

<style lang="scss" scoped>
.base-modal {
  display: flex;
  justify-content: center;
  align-items: center;
  position: fixed;
  top: 0;
  right: 0;
  bottom: 0;
  left: 0;
  z-index: 1000;
  background-color: rgba(0, 0, 0, 0.5);

  .wrap {
    position: relative;
    width: 90%;
    max-width: 500px;
    min-height: 300px;
    background-color: #fff;
    border-radius: 16px;

    .base-button {
      position: absolute;
      top: 20px;
      right: 20px;
      font-size: 20px;
      font-weight: 700;
    }

    .title {
      margin: 20px auto;

      h3 {
        font-size: 26px;
        font-weight: 700;
        text-align: center;
      }
    }

    .content {
      p {
        font-size: 16px;
      }
    }
  }
}
</style>


2. 필요한 modal 컴포넌트 만들기

  • components/modal/ModalCookie.vue

<slot>을 사용해 모달 안의 내용을 작성한다.

해당 방식으로 여러 가지 모달을 만들 수 있다.

<template>
  <BaseModal @close="$emit('close')">
    <h3 slot="title">Cookie Modal</h3>
    <p slot="content">쿠키 모달입니다.</p>
  </BaseModal>
</template>

<script>
import BaseModal from '@/components/base/BaseModal'

export default {
  name: 'ModalCookie',

  components: {
    BaseModal
  }
}
</script>


3. 페이지에 modal import 하기

  • pages/index.vue
  1. 만든 <ModalCookie> 컴포넌트를 import 시킨다.
  2. isModalCookie 속성을 만들어 v-if가 true 이면 모달이 나타나고, false 이면 모달이 사라지게 만든다. 
  3. ModalCookieToggle 클릭 이벤트를 만든다.
<template>
  <TheLayout>
    <BaseButton @click="ModalCookieToggle">쿠키 모달 열기</BaseButton>

    <ModalCookie
      v-if="isModalCookie"
      @close="ModalCookieToggle"/>
  </TheLayout>
</template>

<script>
import TheLayout from '@/components/layout/TheLayout'
import BaseButton from '@/components/base/BaseButton'
import ModalCookie from '@/components/modal/ModalCookie'

export default {
  name: 'Main',

  components: {
    TheLayout,
    BaseButton,
    ModalCookie
  },

  data() {
    return {
      isModalCookie: false
    }
  },

  methods: {
    ModalCookieToggle() {
      this.isModalCookie = !this.isModalCookie
    }
  }
}
</script>

결과 화면


1. RouterName 변수 만들기

  • configs/router.js
  1. RouterName 변수(객체)를 만든다.
  2. 라우터 변수의 이름과 경로를 정의한다. (경로는 pages 폴더에 만든 .vue 파일의 경로와 동일하게 만든다.)

RouterName 변수 파일을 따로 만드는 이유는 피씨 메뉴, 모바일 메뉴, 사이트맵 등 여러 곳에서 사용했을 경우, 이름 또는 경로가 변경되면 여러 번 수정해야 하기 때문에 router 파일을 하나 만들어 import 시켜서 사용하면 한 번만 수정하면 된다.

export const RouterName = {
  MAIN: '/',
  SUB: '/sub',

  AUTH_LOGIN: '/auth/login'
}


2. TheHeader 컴포넌트 만들기

  • components/layout/TheHeader.vue
  1. <script> 태그에 { RouterName }을  import 시킨다.
  2. <script> 태그의 data() 영역에 navigation 변수(배열)를 만든다.
  3. name은 네비게이션 이름, to는 RouterName에 작성한 라우터 변수를 작성한다.
  4. <nav> 태그에 v-for를 사용해 네비게이션을 만든다.
<template>
  <header class="wrap">
    <nav>
      <NuxtLink
        v-for="(nav, key) in navigation"
        :key="`nav-${key}`"
        :to="{ path: `${nav.to}`}">
        {{ nav.name }}
      </NuxtLink>
    </nav>
  </header>
</template>

<script>
import { RouterName } from '@/configs/router'

export default {
  name: 'TheHeader',

  data() {
    return {
      navigation: [
        {
          name: '메인',
          to: RouterName.MAIN
        },
        {
          name: '서브',
          to: RouterName.SUB
        },
        {
          name: '로그인',
          to: RouterName.AUTH_LOGIN
        }
      ]
    }
  }
}

<style lang="scss" scoped>
header {
  ...
}
</style>


3. TheHeader 컴포넌트 import 시키기

  • components/layout/TheLayout.vue
<template>
  <div>
    <TheHeader/>

    <main class="wrap">
      <slot/>
    </main>

    <footer></footer>
  </div>
</template>

<script>
import TheHeader from '@/components/layout/TheHeader'

export default {
  name: 'TheLayout',

  components: {
    TheHeader
  }
}
</script>


  • pages/index.vue
<template>
  <TheLayout>
    <h1>메인 페이지</h1>
  </TheLayout>
</template>

<script>
import TheLayout from '@/components/layout/TheLayout'

export default {
  name: 'Main',

  components: {
    TheLayout
  }
}
</script>

+ Recent posts