목표
- Pinia 설치하기
- Pinia store에서 데이터 불러오기
- toDo 추가 및 삭제하기
결과 화면

버전
node v.20.8.1
nuxt v.3.8.1
vue v.3.3.8
1. Pinia 설치하기
https://jae-study.tistory.com/123
[Nuxt3] #10 Nuxt 3 State Management (일반 변수, useState, pinia 상태 관리 비교)
State management with Nuxt 3 — Course part 10 https://www.youtube.com/watch?v=IkpoAKS1s-k&list=PL8HkCX2C5h0XT3xWYn71TlsAAo0kizmVc&index=10 유튜브 강의를 참고하고 있습니다. State Management란 상태 관리(State Management)에서 상태(Sta
jae-study.tistory.com
Pinia 및 Nuxt3 state에 대한 자세한 설명은 위의 링크를 참고한다.
2. json 데이터 만들기
- server/api/toDoList.json
api가 없기 때문에 json 파일로 빈 배열을 만든다.
[]
3. Pinia store 만들기
- stores/toDoStore.ts
- pinia를 import 한다.
- 만든 toDoList.json 파일을 import 한다.
- useToDoStore 변수를 만들고, state를 정의한다. (초기값은 toDoList.json 파일의 빈 배열)
- Nuxt3은 타입스크립트 기반이기 때문에 interface을 이용해 state의 타입을 정의한다. (배열 안에 객체가 있는 형태)
import { defineStore } from 'pinia'
import toDoList from '../server/api/toDoList.json'

interface ItoDo {
  id: number,
  content: string
}

export const useToDoStore = defineStore('toDo', {
  state: () => ({
    toDoList: toDoList as ItoDo[]
  }),

  actions: {}
})
4. actions 정의하기
4-1. toDoList 추가하기 (addToDo())
- 입력한 toDo(content)를 배열에 push한다.
- 이때 id는 고유한 값을 나타내기 위해 현재 시간(Date.now())으로 한다.
4-2. toDoList 삭제하기 (deleteToDo())
- findIndex 메서드와 id를 이용해 삭제할 toDo의 index를 찾는다.
- splice 메서드를 이용해 배열에서 해당 index의 toDo를 자른다.
4-3. toDoList 전체 삭제하기 (clearToDo())
- toDoList를 빈 배열로 만든다.
- 전체 삭제이기 때문에 window.confirm 창을 통해 알럿 메세지를 보여준다.
...

export const useToDoStore = defineStore('toDo', {
  state: () => ({
    toDoList: toDoList as ItoDo[]
  }),

  actions: {
    addToDo(content: string) {
      this.toDoList.push({ id: Date.now(), content: content })
    },

    deleteToDo(id: number) {
      const index = this.toDoList.findIndex(list => list.id === id)

      if(index > -1) {
        this.toDoList.splice(index, 1)
      }
    },

    clearToDo() {
      if(window.confirm('리스트를 모두 삭제하시겠습니까?')) {
        this.toDoList = []
      }
    }
  }
})
5. 페이지에서 Pinia store 불러오기
- pages/index.vue
- toDoStore를 import 한다.
- newToDo 변수를 만들고, v-model를 이용해 input에 입력한 내용이 양방향 바인딩 될 수 있게 한다.
- Pinia store에 만든 actions을 클릭 이벤트로 만들어 toDo를 추가, 삭제, 전체 삭제한다. (toDo.addToDo(), toDo.deleteToDo(), toDo.clearToDo())
<script setup lang="ts">
import { useToDoStore } from '@/stores/toDoStore'

const toDo = useToDoStore()
const newToDo = ref('')

function addToDo() {
  if(newToDo.value) {
    toDo.addToDo(newToDo.value)
    newToDo.value = ''
  }
}
</script>

<template>
  <section class="w-full max-w-screen-lg m-auto">
    <h1 class="mb-10 text-5xl font-bold text-center">ToDo List</h1>

    <form
        class="mb-5"
        @submit.prevent="addToDo()">
      <label for="toDo" class="block mb-3 text-xl font-bold">New ToDo</label>

      <div class="flex justify-between gap-5">
        <input
            v-model="newToDo"
            type="text"
            id="toDo"
            class="w-3/4 px-3 py-4 rounded text-black"
            placeholder="할 일을 입력해 주세요."/>
        <button class="w-1/4 bg-slate-500 rounded">추가하기</button>
      </div>
    </form>

    <div v-if="toDo.toDoList.length > 0">
      <div class="flex gap-2">
        <button>등록순</button>
        <i>|</i>
        <button>최신순</button>
      </div>

      <ul>
        <li
            v-for="(list, key) in toDo.toDoList"
            :key="key"
            class="flex justify-between items-center gap-5 mt-5 px-5 py-2 border rounded">
          <p class="flex gap-5 text-lg">
            <span>{{ key + 1 }}.</span> {{ list.content }}
          </p>
          <button
              @click="toDo.deleteToDo(list.id)"
              class="px-5 py-2 bg-slate-500 rounded">
            삭제
          </button>
        </li>
      </ul>

      <button
          @click="toDo.clearTodo()"
          class="block w-1/3 mt-10 m-auto px-3 py-4 bg-slate-400 rounded">
        전체 삭제하기
      </button>
    </div>
  </section>
</template>
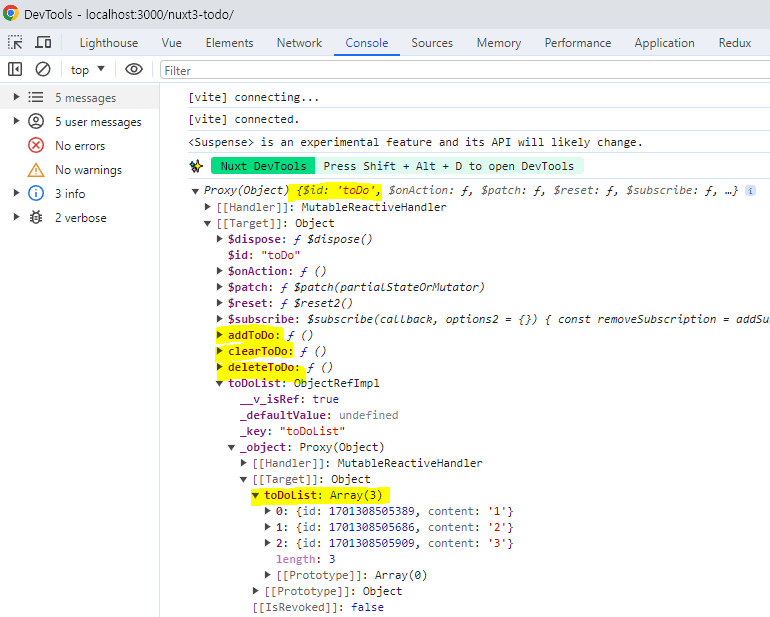
toDoStore를 콘솔로 확인하면 store에 만든 state와 action 등 모든 정보를 확인할 수 있다.
'Vue, Nuxt > Nuxt 3 ToDo 만들기' 카테고리의 다른 글
| [Nuxt3] #6 ToDo List 만들기 - Nest.js + PSQL 연결하기 (useFetch()) (1) | 2023.12.22 |
|---|---|
| [Nuxt3] #5 ToDo List 만들기 - meta 태그 추가하기 (0) | 2023.11.30 |
| [Nuxt3] #4 ToDo List 만들기 - 깃허브 페이지 배포하기 (0) | 2023.11.30 |
| [Nuxt3] #3 ToDo List 만들기 - 등록순/최신순 정렬하기 (0) | 2023.11.30 |
| [Nuxt3] #1 ToDo List 만들기 - 테일윈드 CSS로 레이아웃 만들기 (0) | 2023.11.29 |